Easy Halloween SFX Makeup Tutorial
[vc_row][vc_column][vc_column_text]
One of the things we love the most about Halloween is seeing all the weird and wonderful makeup creations. Whether you’re a professional MUA or you’re a makeup newcomer, Halloween can be the perfect opportunity to display your creative talents. If you’re attempting to dabble with SFX this year or just need a quick, fail-safe look for the 31st, then we’ve got the tutorial for you. Follow @alice_crue’s step-by-step guide to create a gruesome cut on the cheek using SFX makeup.
[/vc_column_text][/vc_column][/vc_row][vc_row][vc_column][vc_text_separator title=”Step One”][vc_single_image image=”77318″ link=”url:https%3A%2F%2Fwww.beautybay.com%2F||target:%20_blank” onclick=”custom_link”][vc_column_text]
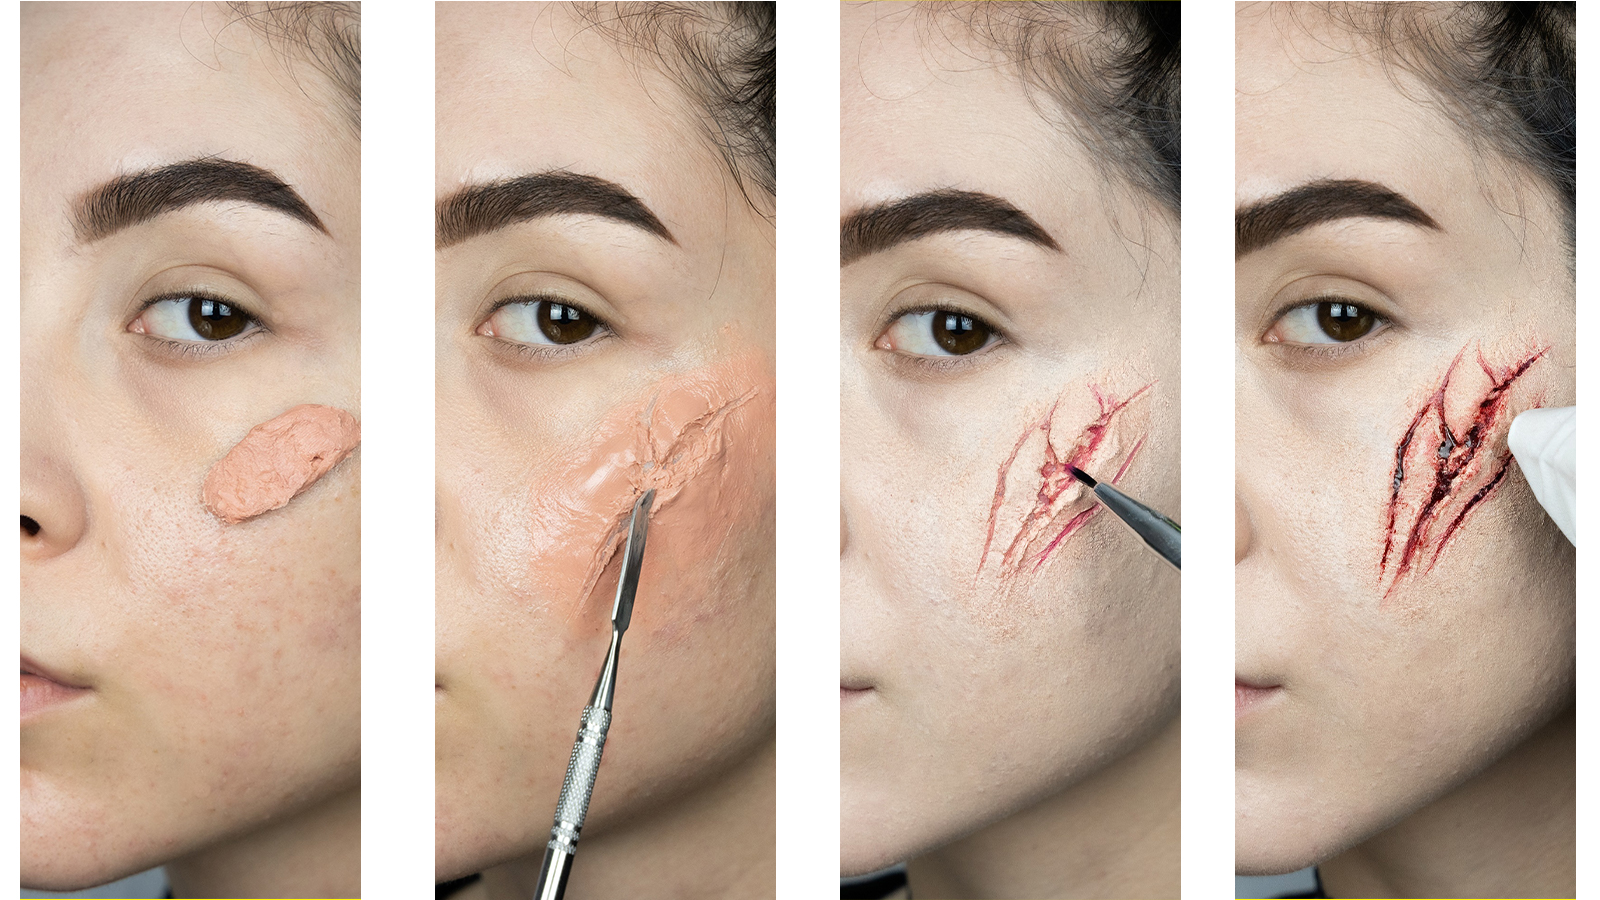
Scoop out some of the Mehron Modelling Wax using a spatula or your fingers.
[/vc_column_text][/vc_column][/vc_row][vc_row][vc_column][vc_text_separator title=”Step Two”][vc_single_image image=”77319″ link=”url:https%3A%2F%2Fwww.beautybay.com%2F||target:%20_blank” onclick=”custom_link”][vc_column_text]
Roll the wax and stick it to the cheekbone (or wherever else you would like to create the cut). To make the Modelling Wax easier to manipulate, apply clear lip balm to your fingers.
[/vc_column_text][/vc_column][/vc_row][vc_row][vc_column][vc_text_separator title=”Step Three”][vc_single_image image=”77320″ link=”url:https%3A%2F%2Fwww.beautybay.com%2F||target:%20_blank” onclick=”custom_link”][vc_column_text]
Using either a spatula or your fingers, blend the edges of the Modelling Wax into the skin, creating a smooth, seamless edge.
[/vc_column_text][/vc_column][/vc_row][vc_row][vc_column][vc_text_separator title=”Step Four”][vc_single_image image=”77321″ link=”url:https%3A%2F%2Fwww.beautybay.com%2F||target:%20_blank” onclick=”custom_link”][vc_column_text]
Using the spatula or the end of a makeup brush, start to create indentations and cuts into the wax to add detail.
[/vc_column_text][/vc_column][/vc_row][vc_row][vc_column][vc_text_separator title=”Step Five”][vc_single_image image=”77322″ link=”url:https%3A%2F%2Fwww.beautybay.com%2F||target:%20_blank” onclick=”custom_link”][vc_column_text]
Experiment using different tools (Alice used a toothpick) to create detailing and life-like cuts.
[/vc_column_text][/vc_column][/vc_row][vc_row][vc_column][vc_text_separator title=”Step Six”][vc_single_image image=”77323″ link=”url:https%3A%2F%2Fwww.beautybay.com%2F||target:%20_blank” onclick=”custom_link”][vc_column_text]
Apply a foundation or concealer over the wax, starting with small amounts and slowly building.
[/vc_column_text][/vc_column][/vc_row][vc_row][vc_column][vc_text_separator title=”Step Seven”][vc_single_image image=”77324″ link=”url:https%3A%2F%2Fwww.beautybay.com%2F||target:%20_blank” onclick=”custom_link”][vc_column_text]
Next, take the Mehron Paradise Makeup AQ 8 Color Palette Basic and mix plenty of water with the red shade. Apply this to the centre of the indentations in the wax, using a fine liner brush.
[/vc_column_text][/vc_column][/vc_row][vc_row][vc_column][vc_text_separator title=”Step Eight”][vc_single_image image=”77325″ link=”url:https%3A%2F%2Fwww.beautybay.com%2F||target:%20_blank” onclick=”custom_link”][vc_column_text]
To create depth, mix the brown shade with the red to create a deeper shade and apply to the deepest points of the wax.
[/vc_column_text][/vc_column][/vc_row][vc_row][vc_column][vc_text_separator title=”Step Nine”][vc_single_image image=”77326″ link=”url:https%3A%2F%2Fwww.beautybay.com%2F||target:%20_blank” onclick=”custom_link”][vc_column_text]
Now it’s time to add some blood. Take some of the Mehron Coagulated Blood Gel and apply to the cuts. The trick here is to remember that less is more – too much blood will make it look less realistic.
[/vc_column_text][/vc_column][/vc_row][vc_row][vc_column][vc_text_separator title=”Step Ten”][vc_single_image image=”77327″ link=”url:https%3A%2F%2Fwww.beautybay.com%2F||target:%20_blank” onclick=”custom_link”][vc_column_text]
Using a wet cotton bud, dab onto the Coagulated Blood and re-apply to the edges of the cut to help make it look more realistic.
[/vc_column_text][/vc_column][/vc_row][vc_row][vc_column][vc_text_separator title=”Step Eleven”][vc_single_image image=”77328″ link=”url:https%3A%2F%2Fwww.beautybay.com%2F||target:%20_blank” onclick=”custom_link”][vc_column_text]
Use a tissue to remove excess blood and your look is complete.
[/vc_column_text][/vc_column][/vc_row][vc_row][vc_column][vc_text_separator title=”Final look”][vc_single_image image=”77329″ link=”url:https%3A%2F%2Fwww.beautybay.com%2F||target:%20_blank” onclick=”custom_link”][/vc_column][/vc_row][vc_row][vc_column][vc_text_separator title=”YOU’LL NEED”][/vc_column][/vc_row][vc_row][vc_column width=”1/3″][vc_single_image image=”77334″ caption=” MEHRON PROFESSIONAL MODELING PUTTY WAX” link=”url:https%3A%2F%2Fwww.beautybay.com%2Fp%2Fmehron%2Fprofessional-modeling-putty-wax%2F||target:%20_blank” onclick=”custom_link”][/vc_column][vc_column width=”1/3″][vc_single_image image=”77335″ caption=” MEHRON PARADISE MAKEUP AQ 8 COLOR PALETTE BASIC” link=”url:https%3A%2F%2Fwww.beautybay.com%2Fp%2Fmehron%2Fparadise-makeup-aq-8-color-palette-basic%2F||target:%20_blank” onclick=”custom_link”][/vc_column][vc_column width=”1/3″][vc_single_image image=”77336″ caption=”MEHRON COAGULATED BLOOD GEL” link=”url:https%3A%2F%2Fwww.beautybay.com%2Fp%2Fmehron%2Fcoagulated-blood-gel%2F||target:%20_blank” onclick=”custom_link”][/vc_column][/vc_row][vc_row][vc_column][x2764tech_cta_button full_width=”yes” text=”SHOP HALLOWEEN” link=”url:https%3A%2F%2Fwww.beautybay.com%2Fl%2Fhalloween-makeup%2F||target:%20_blank”][/vc_column][/vc_row]