Disney Colour and BEAUTY BAY: Disney's Alice In Wonderland-Inspired Makeup Tutorial
[vc_row][vc_column][vc_column_text]
So, you’ve met the Disney Colour and BEAUTY BAY Collection, but now it’s time to get to know the shades, the formula, and the looks. To help you step into a world of colour and bring the nostalgia to life, @neutraltiger has created a trio of tutorials, each showcasing one of the Disney Colour and BEAUTY BAY Mini Palettes.
‘I have chosen to do a more technical look with the Disney Colour and BEAUTY BAY Mini Palette Alice in Wonderland. Expect a full cut crease and plenty of gorgeous complimentary colours.’ – @neutraltiger
Get ready, colour is coming your way…
[/vc_column_text][/vc_column][/vc_row][vc_row][vc_column][vc_text_separator title=”STEP ONE”][vc_single_image image=”76887″ link=”url:https%3A%2F%2Fwww.beautybay.com%2Fs%2Fdisney-colour-and-beauty-bay%2F||target:%20_blank” onclick=”custom_link”][vc_column_text]
Start by prepping the eyes with By BEAUTY BAY’s Eye Base. This will ensure the best colour payoff from the shadows and will increase the longevity of the look.
[/vc_column_text][/vc_column][/vc_row][vc_row][vc_column][vc_text_separator title=”STEP TWO”][vc_single_image image=”76888″ link=”url:https%3A%2F%2Fwww.beautybay.com%2Fs%2Fdisney-colour-and-beauty-bay%2F||target:%20_blank” onclick=”custom_link”][vc_column_text]
Take the shade Cheshire Cat TREE from the Disney Colour and BEAUTY BAY Mini Palette Alice In Wonderland, and pack it into the crease following the shape of the eye and lifting slightly in the outer corner.
[/vc_column_text][/vc_column][/vc_row][vc_row][vc_column][vc_text_separator title=”STEP THREE”][vc_single_image image=”76889″ link=”url:https%3A%2F%2Fwww.beautybay.com%2Fs%2Fdisney-colour-and-beauty-bay%2F||target:%20_blank” onclick=”custom_link”][vc_column_text]
Begin to blend this upwards, using shade Cheshire Cat FUR. Use a small fluffy brush and soft pressure to get a flawless blend.
[/vc_column_text][/vc_column][/vc_row][vc_row][vc_column][vc_text_separator title=”STEP FOUR”][vc_single_image image=”76890″ link=”url:https%3A%2F%2Fwww.beautybay.com%2Fs%2Fdisney-colour-and-beauty-bay%2F||target:%20_blank” onclick=”custom_link”][vc_column_text]
Next is the cut crease. To get the cleanest cut, take some makeup remover on a cotton bud and remove any excess product from the lid. This will help to prevent the blue shadow from mixing with the Eye Base and changing the colour of the cut crease.
[/vc_column_text][/vc_column][/vc_row][vc_row][vc_column][vc_text_separator title=”STEP FIVE”][vc_single_image image=”76891″ link=”url:https%3A%2F%2Fwww.beautybay.com%2Fs%2Fdisney-colour-and-beauty-bay%2F||target:%20_blank” onclick=”custom_link”][vc_column_text]
To create a cut crease, take By BEAUTY BAY’s Eye Base on a flat brush and create the desired shape. Try to pat the product onto the lid rather than dragging it to get a clean line. @neutraltiger has cut out the shape of her eyelid using the base and added a little flick in the outer corner to create a lifting effect.
[/vc_column_text][/vc_column][/vc_row][vc_row][vc_column][vc_text_separator title=”STEP SIX”][vc_single_image image=”76892″ link=”url:https%3A%2F%2Fwww.beautybay.com%2Fs%2Fdisney-colour-and-beauty-bay%2F||target:%20_blank” onclick=”custom_link”][vc_column_text]
Using the same flat brush, set this with the shade Cheshire Cat TEETH.
[/vc_column_text][/vc_column][/vc_row][vc_row][vc_column][vc_text_separator title=”STEP SEVEN”][vc_single_image image=”76893″ link=”url:https%3A%2F%2Fwww.beautybay.com%2Fs%2Fdisney-colour-and-beauty-bay%2F||target:%20_blank” onclick=”custom_link”][vc_column_text]
Next, taking the shade Cheshire Cat STRIPE, apply this to the lid and blend into the white shade with a small fluffy brush, deepening in the outer corner with Cheshire Cat FACE.
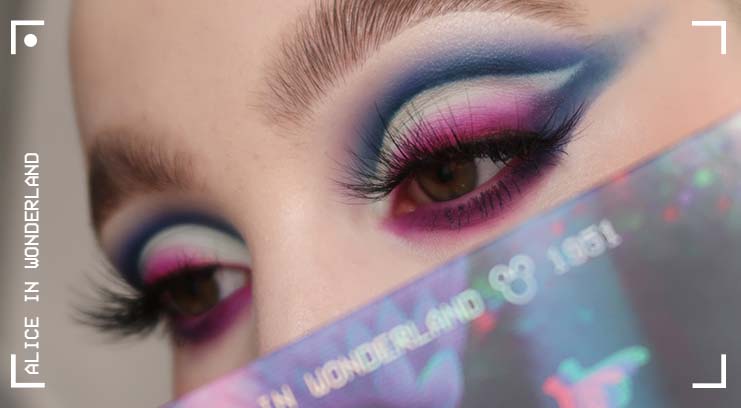
[/vc_column_text][/vc_column][/vc_row][vc_row][vc_column][vc_text_separator title=”STEP EIGHT”][vc_single_image image=”76894″ link=”url:https%3A%2F%2Fwww.beautybay.com%2Fs%2Fdisney-colour-and-beauty-bay%2F||target:%20_blank” onclick=”custom_link”][vc_column_text]
For the lower lash line, apply the Disney Colour and BEAUTY BAY Shadow Stick in the shade Cheshire Cat FUR and set this with the same shadow shades used on the eye.
[/vc_column_text][/vc_column][/vc_row][vc_row][vc_column][vc_text_separator title=”STEP NINE”][vc_single_image image=”76895″ link=”url:https%3A%2F%2Fwww.beautybay.com%2Fs%2Fdisney-colour-and-beauty-bay%2F||target:%20_blank” onclick=”custom_link”][vc_column_text]
Top off the look with some lashes or mascara and apply a touch of the Disney Colour and BEAUTY BAY Lip & Cheek Duo Mad Hatter FACE to the lips.
[/vc_column_text][/vc_column][/vc_row][vc_row][vc_column][vc_text_separator title=”YOU’LL NEED”][/vc_column][/vc_row][vc_row][vc_column width=”1/3″][vc_single_image image=”77220″ caption=”BY BEAUTY BAY DISNEY COLOUR AND BEAUTY BAY SHADOW STICK CHESHIRE CAT FUR” link=”||target:%20_blank” onclick=”custom_link”][/vc_column][vc_column width=”1/3″][vc_single_image image=”76448″ caption=”Disney Colour and BEAUTY BAY Mini Palette Alice In Wonderland” link=”||target:%20_blank” onclick=”custom_link”][/vc_column][vc_column width=”1/3″][vc_single_image image=”76438″ caption=”Disney Colour and BEAUTY BAY Lip & Cheek Duo Mad Hatter Face” link=”url:https%3A%2F%2Fwww.beautybay.com%2Fl%2Fbeautybay%2F%3Ff_filter_collection%3DDisney%2BColour%2Band%2BBEAUTY%2BBAY||target:%20_blank” onclick=”custom_link”][/vc_column][/vc_row][vc_row][vc_column width=”1/3″][vc_single_image image=”77213″ caption=”BY BEAUTY BAY EYE BASE” link=”url:https%3A%2F%2Fwww.beautybay.com%2Fp%2Fbeauty-bay%2Feye-base%2F||target:%20_blank” onclick=”custom_link”][/vc_column][vc_column width=”1/3″][vc_single_image image=”77214″ caption=”BY BEAUTY BAY FAUX EYELASH TRIO” link=”url:https%3A%2F%2Fwww.beautybay.com%2Fp%2Fbeauty-bay%2Ffaux-eyelash-trio%2F||target:%20_blank” onclick=”custom_link”][/vc_column][vc_column width=”1/3″][vc_single_image image=”77216″ caption=”BY BEAUTY BAY PRIME & SET DUO” link=”url:https%3A%2F%2Fwww.beautybay.com%2Fp%2Fbeauty-bay%2Fprime-and-set-duo%2F||target:%20_blank” onclick=”custom_link”][/vc_column][/vc_row]